

Thursday, January 29, 2015
Sympathy - Bird and Branch
Monday, January 26, 2015
Card Club - Jan - Baby Bird

Card Club - Jan - Butterfly HB

I color printed the greeting layer to match the card color. I then trimmed this layer to leave a small border. I then ran the layer through the Big Shot with the Sizzix Winged Beauties butterfly die. I added wax paper between the metal die and the card stock which made removing the diecut from the die very easy. Good Idea!!! The greeting layer was then glued to the card front. I placed adhesive only on the body of the butterfly and placed it back into the hole in the greeting layer. Then the wings can be brought forward gently. Clean and simple card.
Card Club - Jan - Masculine HB

Card Club - Jan - Heart Doily

I stamped dots on the hearts with a VersaFine Onyx ink pad to repeat the dots in the background. I printed the polka dot background I designed onto a 4.25 x 11 inch card. Once folded, I placed adhesive on the solid center of the heart and placed it near the fold at the top of the card. I used a piece of thread which was dyed that the same time as the heart and added a piece of black thread. These were wrapped around the card front and knotted once. The metal heart charm was then added and then the another knot was made. The ends were trimmed.
Card Set - Card Club Thank You

This card is from the Eventful Year collection. I placed the banner and used the Thank You from the same collection in Poppy Parade.

This card is a flower stamp from the Fresh Vintage set. The color is Lucky Limeade with a black outline. I added a thin black border.

 This birthday card is done with Pretty Petites in Groovy Guava and Chocolate Chip.
 The star is from Sprinkled Expressions in Baja Breeze.

This is a set of cards which adds to the recipients supply on hand. They can quickly write up a quick note or add to a gift when needed.
Card Club - My Thank You

 I used flat panel card and envelopes sets. The envelopes were not A2 sized so I had to cut down the white card before I planned the other pieces. The colored flat panel was then cut down to leave a small border. I used my Big Shot with the Memory Box Thanks greeting die and cut the hole. I punched the ribbon border with a Fiskars punch being careful to have an odd number of slots on right and left hand sides. I ran chose white seam binding to match the card and ran it through he slots and knotted it on the front. Trimmed the ends. This layer was then adhered to the white card front. I chose not to glue the hole pieces on the a and k.
Saturday, January 24, 2015
Cards - Photos ReUsed

I cut the photo down to 3.75 square and adhered it to the top of the card. I added faux stitching all the way around the photo with a black marker. I choose turquoise card to work with the blue in the patina of the bell.

I glued a Cricut diecut leftover from this project below the photo. I used my quick dry paper adhesive which has a very pointed end on the bottle which was helpful with the small pieces here. I choose a warm green to work with the various greens in the foliage. I really like this zebra pic.
Thursday, January 22, 2015
Chinese Photo Collage

Wednesday, January 21, 2015
HPC - Butterfly Trio

Cards - Shrink Plastic Flowers

I found yellow buttons to put in the centre of the flowers which I will string into the holes I made in the shrink plastic flowers. I made a background starting with a white quarter sheet which I sponged with Tim Holtz Distress Stain in Tattered Rose (light) and Victorian Velvet (darker). I stamped the SU Background Builder (script) stamp with Paprika ink in several directions. I glued this layer to a warm rosy ginger card leaving a small border. I cut the stem and leaves by hand and glued them to the card front. I tacked the flower in place, used a push pin to make the holes through the card front using the holes in the flower. I strung yellow thread through the button, the flower and the card front and tied in a knot on the front.

For the card on the right I used Tim Holtz Distress Stain in Antique Linen (light) and Crushed Olive (darker). I stamped the SU Background Builder (script) stamp with Paprika ink in several directions.
These cards likely will not go through the mail without extra postage.
Tuesday, January 20, 2015
How To: Mixed Media - Shrink Plastic Flowers

Blog Giveaway - Mixed Media Question
I'm wanting to expand my use of Mixed Media Techniques in my card making. I started with Shrink Plastic and Alcohol Inks. Check this post for how to.
I have the calendars below to give away.


I'm looking forward to reading what you are working on.
Mono Printing Sewing Machine Stitching Using Fabric Paste in a Stencil
Here are some sites which provide information on Mixed Media Techniques if you need some inspiration.
https://techniqueszone.wordpress.com/site-menu/mixed-media-techniques/
http://www.clothpaperscissors.com/mixed-media-collage/
http://mycreativescrapbook.blogspot.ca/2013/02/mixed-media-techniques-by-yuko-tanaka.html
http://artfulparent.com/2014/11/create-mixed-media-flowers.html
http://lindapetersondesigns.blogspot.ca/2013/07/8-of-best-of-mixed-media-monday-video.html
Please answer this question:
What mixed media techniques will you use or try this year?
I will pick 2 people randomly from those who leave a comment with a profile on this post. Anonymous comments will not be considered. I will make the selections on February 20th, 2015.I have the calendars below to give away.

I did a bit of research on-line.
Alcohol ink on hard surfaces Beeswax Collages Shrink Plastic accents Packing Tape Transfers Air Drying Clay Start an Art JournalMono Printing Sewing Machine Stitching Using Fabric Paste in a Stencil
Here are some sites which provide information on Mixed Media Techniques if you need some inspiration.
https://techniqueszone.wordpress.com/site-menu/mixed-media-techniques/
http://www.clothpaperscissors.com/mixed-media-collage/
http://mycreativescrapbook.blogspot.ca/2013/02/mixed-media-techniques-by-yuko-tanaka.html
http://artfulparent.com/2014/11/create-mixed-media-flowers.html
http://lindapetersondesigns.blogspot.ca/2013/07/8-of-best-of-mixed-media-monday-video.html
Monday, January 19, 2015
Exchange Cards - Reused Photo


I then added a stitched border by hand with a find black felt tip marker.
This makes a smart looking single layer card and allows me to re use the photos from the calendar which I really wanted to do.
I'm happy with these and I hope the girls like them too!
Sunday, January 18, 2015
R2G Card Kits - Valentine - Red Heart Punch

R2G Card Kits - Valentine - Antique Map Heart


Alternative: Turn the heart over and you have a red heart! It works well on the kraft card.
R2G Card Kit - Valentines - Owl Heart Circle

I don't think so. I found this blue and green round tag freebie at Poppies at Play. I sized it to 2" and cut it with one of the smooth circle Spellbinders nestabilities. Then I cut a heart circle frame with SB - Heart Circles nestabilities which was perfect for the 2" circle. I added a 2" strip of black card stock layered onto a wider strip of white card stock. This was placed onto a blue card. Once the owl greeting was adhered to the green heart circle it was adhered to the card front with 3D foam tape. I thought the sentiment was great!
R2G Card Kit - Valentine - Paper Heart Doily

You will remember these doily hearts from this posting. I created a polka dot background in black that I printed directly onto the card. This card is 4.25 x 11 and therefore has the fold at the top of the card. I wanted to add a bit of black to the heart to help tie it all together. I used a Stampin Up Itty Bitty Background stamp with Versafine Onyx Black. I placed my adhesive on the solid centre of the heart and placed it at the top of card. I dyed the thread at the same time as the hearts so they match perfectly. I added a black thread as well which I wrapped around the card front and knotted on the front. I added a metal heart charm before I tied the second knot. I trimmed the thread ends and added my insert.
Friday, January 16, 2015
HB - Windows Frame & Prima Flowers

I started with a Stampin Up! So Saffron card base. I cut a piece of striped Really Rust DSP with the Window Frames Collection Framelits. I then cut a 3" square of copper metallic card stock which I placed behind the die cut aligning the corners. I adhered these two the card front. I chose the Chocolate Chip marker and ink the birthday stamp in the Sincere Salutations set and stamped it in the bottom right hand corner. I then used the fine end of the marker to add stitching around the copper square. I then, selected 2 Prima Flowers - a large light yellow and a smaller orange. I then added a smaller rust and a smaller still handmade paper yellow one. These were layered onto each other from smallest to largest. They were placed in the center of the die cut and held in place with a dark brown brad.
Sunday, January 11, 2015
Christmas Thank Yous

I ripped the bold red and white snowflake paper. I glued it to white card stock. I then cut it down to 4"x5.25" and glued it to a black card. I then added a strip of green card stock across the bottom third of the card. I found this chalkboard background onto which I added my chalkboard sentiment. I printed them and trimmed them close. It is mounted to the card front with 3D foam tape.

Thursday, January 8, 2015
Sympathy - Floral District

Saturday, January 3, 2015
How To: Color Paper Doilies
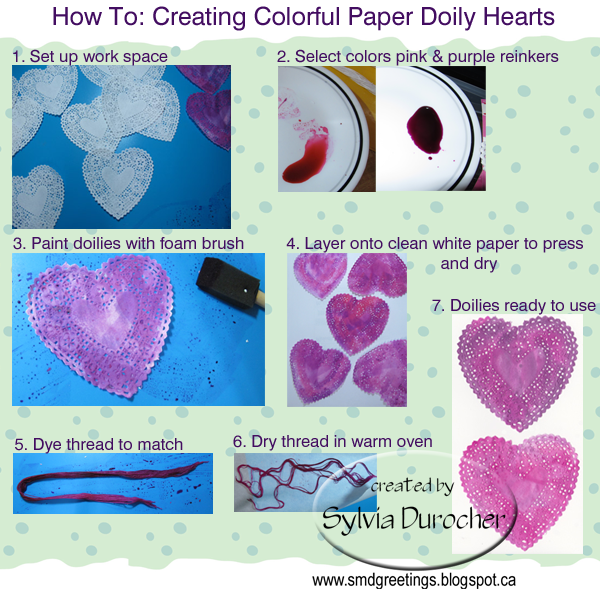
1. I set up a plastic mat on my counter so I would not stain it. I have to get gloves so I don't stain my hands cause that will take a few days to disappear.
2. I selected pink and purple as my colors. I am using dye stamp pad re-inkers. The colors are Nick Bantock Passion Plum and the hot pink I've owned forever from the Great Canadian Stamp Company.
3. I diluted the ink with water and applied it with a foam brush.
4. I placed the dyed wet doilies onto white computer paper with extra sheets to absorb the moisture and pressed them under heavy books.
5. I'm going to need thread to match so I dyed some heavy crochet cotton at the same time to ensure that the colors match perfectly. I placed the wet thread on parchment paper and placed that on a cookie sheet and put it into a warm oven - I had turned it off.
7. Several hours later I have perfectly flat and wonderfully colored doilies ready to use.
Keep an eye out here for the project in the weeks to come.
Thursday, January 1, 2015
Christmas Card Challenge - Jan - Snowflake Masking Tissue Paper

Tissue Paper - I created a tissue paper background. I glued ripped blue tissue paper to white card stock in random pattern in a landscape orientation. I left some wrinkles as I saw fit.
Masking - I cut a mask which left a large border. I placed it in the center of the blue card. Using a sponge with my Stampin Up Whisper White Craft Ink pad I brushed white ink away from the mask onto the blue card leaving the blue border. I trimmed the background paper to smaller than the masked area and glued it down. Snowflake - I punched a Martha Stewart snowflake from pearl paper and layered it onto another punched from the same color as the card. I added a small circle of the same as the card to the center of the white snowflake. I mounted these onto the card front with 3D foam tape. I designed a long banner greeting in the same color as the card. I trimmed it by hand with scissors. This was mounted with 3D foam tape as well.
2015 Christmas Card Challenge
Here are the challenges I have prepared for making Christmas Cards in 2015. If you have been following me for a while you will know that I have learned that it maintains sanity to get Christmas cards made each month so that December 1st all I have to do is address them and send them off. In order to achieve this goal I create guidelines for my card challenge each month.
Each month has a Focus / Technique / Element. You can choose one or two or all three to help you stretch your creativity. I hope you will join me in making cards each month. If you do, please post a comment with a link to your card so all can enjoy it.
Each month has a Focus / Technique / Element. You can choose one or two or all three to help you stretch your creativity. I hope you will join me in making cards each month. If you do, please post a comment with a link to your card so all can enjoy it.
Focus Technique Element
January Snowflake Masking Tissue PaperFebruary Star Layering Ribbon
March Gingerbread Stitching PlaidApril Peace Coloring Large Greeting
May Snowman Paper Piecing TagJune Nativity Brayering Glitter
July Santa/St. Nick Spattering ButtonsAugust Joy Embossing Chipboard
September Skates Die Cutting BannerOctober Angels Stamping Vellum
November Wreath Folding FiberDecember Love Stenciling Doily
Happy New Year 2015

Wishing you all a very happy new year and all the best in 2015! May we find new paper crafts to do, new ways to do what we used to do (die cutting, coloring and much more), and add more dimension to our lives which include healthy exercise and habits.
Subscribe to:
Posts (Atom)